Surgical Grossing: Special Cases
There are some unique specimens received in the histology laboratory that may cause problems for the histologist ifnot handled properly at the time of surgical grossing. The following specimen types are described and specific procedures are recommended for their successful handling in the Procedures section of the laboratory manual “Dermatopathology Laboratory Techniques” by Clifford M. Chapman and Dr. Izak Dimenstein (revised 2014).
- Skin specimens for alopecia
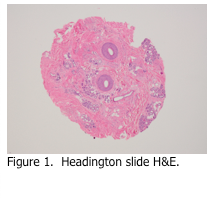
Skin specimens may be taken from the scalp in order to determine if the patient is suffering from alopecia (hair loss). These are almost always punch specimens, and are usually 3-4 mm in diameter. In order to count hair follicles for comparison, these are the only skin specimens that are not cut perpendicular to the dermal-epidermal junction. Rather, they are cut parallel to it, resulting in cross sections of the hair follicles. This method was developed by Dr. Headington, and is referred to as the Headington procedure (Figure 1). - Skin specimens for Direct Immunofluorescence (DIF)
Skin specimens may be taken from lesional, sun exposed and non-sun exposed areas from patients by dermatologists who suspect the patients may have bullous (blistering) or autoimmune (lupus) diseases. In these cases, two specimens are usually submitted: one in formaldehyde, the other in Immunofluorescence Transport Medium. This medium may also be referred to as Michel’s medium, named after the doctor who developed it. The medium consists of buffered ammonium sulfate that acts to fix proteins at their site within the skin specimen. Once received in the laboratory, the specimens are washed in buffer and frozen in cryostat embedding medium for cryostat sectioning and subsequent staining with immunofluorescence reagents. It is imperative that specimens submitted for DIF not be fixed in formaldehyde. Once a specimen is exposed to formaldehyde, it is rendered useless for DIF.
- Tiny specimens

Some skin specimens may be very tiny; on the order of less than 0.1 cm. Some personnel use mesh cassettes, “tea bag” biopsy pouches, sponges, wrapping paper, etc. in order to contain the specimen and prevent it from escaping the tissue processing cassette. A disadvantage of the above methods is that upon embedding, the specimen has to be handled yet again, possibly resulting in additional fragmentation of the tissue, or possibly complete tissue loss.An alternative method is to use a product called “HistoGel”. HistoGel is a liquid at 55 C, and has a gelatin consistency at room temperature. The idea is simply to surround the tiny tissue fragment with liquefied HistoGel, allow it to cool to room temperature (two minutes), thereby trapping the tissue fragment in the HistoGel, much the same way fruit is embedded in the gelatin of a Jello fruit mold. The resulting “button” of HistoGel containing the tissue is placed into a tissue processing cassette and processed as usual. During embedding, the button is simply removed from the cassette and embedded as usual. Additional slides may have to be taken in order to reach the tissue fragment, however, the tissue cannot be lost or damaged in process. This fact far outweighs the extra effort involved during the surgical grossing procedure. - Nail specimens
Fingernail or toenail specimens may be received in the laboratory for histology. Usually, the clinician suspects a fungal infection, however, in some cases, a malignant melanoma may be suspected. In either case, the nail must first be fixed thoroughly in formaldehyde. After fixation, the nail should be held overnight in nail softening solution, which will soften and continue to fix the nail. The following day, the specimen may be processed routinely into a paraffin block. After cutting, the sections should be picked up on gelatin coated slides. This insures that the sections will adhere to the slide during H&E, PAS and immunohistochemical staining. - Bone specimens
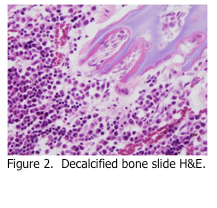
There are many methods available for decalcification of bone; however the preferred one uses a mixture of formic acid and formaldehyde as the decalcifying reagent. Although formic acid decalcification is somewhat slow, the resulting histology is far superior to agents that contain hydrochloric and/or nitric acid (Figure 2). Regardless of what decalcifying reagent is used, the following principles apply.Bone must be thoroughly fixed in formaldehyde prior to decalcification. Once fixed, the specimens should be placed into a volume of decalcifying reagent that is at least 100 times the volume of the tissue specimen. Ideally, the solution should be agitated during decalcification (i.e. rotary shaker) if possible. After 24 hours, the specimen should be removed and checked for decalcification progress. This can be done physically, by using a blade or needle to attempt to penetrate the bone, or it can be done biochemically. Either way, once the bone is soft enough, it should be cut into 2 mm slices in order to increase surface area and make decalcification more efficient. Once decalcification is complete, the specimen should be rinsed in running tap water for 2-3 hours in order to remove traces of decalcifying reagent. The tissue is now ready to be routinely processed. Once the slides are cut, they should be picked up on gelatin coated slides, as described above for nail specimens.